
One of my most favorite successes as a lavender farmer last year was the propagation of 500 lavender starts to plant in our new field. In Part 1 of our propagation blog series we looked at what propagation is, and why you may want to propagate your lavender. Now it’s time to get ready for Part 2: Cuttings!
There are two times of year you should take cuttings for lavender propagation: spring and fall.
When should I take cuttings?
Propagation in the fall can only be done from the hardwood (woody/base part of the plant), whereas propagation in the spring can come from either hardwood or softwood (the new, green stems of your plant) cuttings. There are pros and cons to each type of propagation, but the general consensus is that softwood cuttings are easier to take root (and there’s no chance of damage to the plant), but hardwood cuttings have a higher overall success rate. However, in my experience doing cuttings for the first time last year, the softwood cuttings were not only simple, but I had a 90% success rate (of the 500 cuttings I took, 450 took root into healthy lavender starts.)
The type of propagation you choose depends entirely on your preferences and what time of year it is. This blog is focusing on spring/softwood cuttings for propagation.
For softwood cuttings, you need to wait until mid-late spring, when the stems are a minimum of 3” long and have at least two “nodes”. We like to wait until the stems are at least 4" long, right before buds begin to form. In Sequim (zone 8), we begin our softwood cuttings the second week of May.
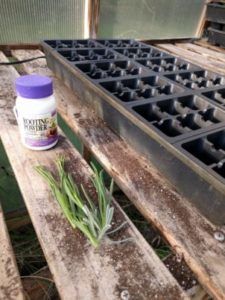
What tools and equipment do I need?
Before you begin, make sure you have:
- Sterilized scissors, pruners, or sharp knife
- Small bucket or bowl with 1-2 mm of water in the bottom
- Seedling plug/trays
- Seed starting mix
- Rooting Hormone (powder)
- Pencil
How and where do I cut the stems?
When you’ve selected the plant(s) you want to propagate, take your scissors and container (with a small amount of water in the bottom) outside to the plant. Ideal stems are:
- 3”+ Long between nodes
- Straight
- Healthy Color
- No Buds
- At least two nodes (a node is a bump where the stem is starting new growth/leaves).
Cut the stem long (you can trim it in the greenhouse), but again, ensure that it is at least 3” long from the bottom node to the top node. Place it in the bucket, so it can stay moist in the water while you take additional cuttings. If this is your first time propagating, be sure to take approximately 30% more cuttings than you need for total plants (so if you want to make 3 new plants, take at least 5 cuttings). It’s always better to have more than you need instead of coming up short – if they all survive, you can find other places to plant them, or give them away!
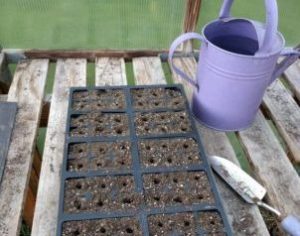
How do I plant the cuttings so they take root?
Step 1: Prepare the soil.
Back in the greenhouse, fill your seedling trays with seed starter soil, water them, and use your pencil to make a hole in the center of each plug approximately 1” deep. Once your seed trays are prepped, you’re ready to start planting!
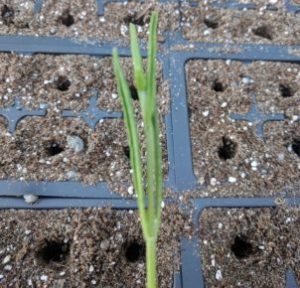
Step 2: Select what part of the stem to keep.
Select a cutting from your bucket. Find the straightest, healthiest part of the stem to focus on (it could be anywhere on the stem – not necessarily the very bottom). You are looking for straight 3-4” length of stem with a node at the top. It is fine if there are other nodes along the stem, as long as there is a minimum of 3 inches ending in a node.
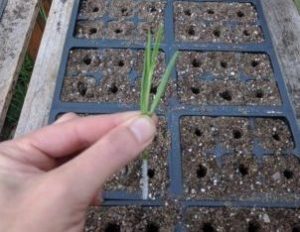
Step 3: Prepare the stem for planting.
Cut (or pinch) the remaining stem off from the “top” node, leaving the leaves on either side. Don’t worry if you couldn’t find any stems without buds forming – just pinch them off now. Remove all other leaves along the stem. Your final cutting should be 3-4” of straight stem with two leaves at the very top (like a Y with a very long tail). Depending on how late you are taking your cuttings and how long you cut them, you may end up with a few nodes along the stem- this is fine – just remove the leaves.

Step 4: Plant the cutting.
Moisten the end of the cutting in the bucket water, then dip it into the rooting hormone up to approximately 1”. Place the cutting in the pencil hole and press the soil gently around the cutting, to keep it upright. Repeat the above steps until you’ve planted all your cuttings.
Step 5: Water & Sunlight
Before walking away, add a little more water to your cuttings. I like to use a spray bottle to water for the first week or two (rather than a watering can or cup), because there’s less chance of the soil moving around and disrupting the cutting. If you don’t have a spray bottle, just use a very tiny container, like a tablespoon, and gently water the starts with that. Be sure to leave your starts in a warm (not hot) sunlit place. If you don’t have a greenhouse, a windowsill is fine.

Conclusion
That’s all there is to it – you’re halfway to brand new lavender plants! It may seem like a lot of steps, but once you do your first one, you’ll see how simple it is. Be sure to water your starts every day while they’re in their seed starters – there’s very little soil, so it won’t retain much moisture.
In Part 3, I discuss how in 4-6 weeks you’ll be ready to transplant them to 3” pots, and then out to the yard 4-6 weeks after that!
8 Replies to “Lavender Propagation (Part 2): Cuttings”
Planting Lavender (part 1): Choosing your location – Lavender Connection
[…] bought some starts from your local nursery, or you tried your hand at propagating (read: parts one, two, and three of our Lavender Propagation blog series) you have new lavender starts that you’re […]
Diana
Great help
kei
Thank you for this! It’s wonderfully detailed and the pictures helped a lot!
Stephanie
Do you water the cuttings everyday till roots form ? How long and often should I water the cuttings ?
Rebecca Olson[ Post Author ]
Yes! To be clear, you should plant the cuttings as soon as possible after cutting them – unlike some plants, you can’t just leave lavender cuttings in water (without soil) to propagate, because they will rot. So once you’ve planted the cuttings, water them immediately, and then water every day after that. Check out “Step 5″ above for my thoughts on how best to water them. Once you transplant to 3″ pots (after 4-6 weeks) you can water every other day, but I prefer to water every day (but I also ensure my soil for the 3” pots has sand in it to help with speedy drainage.) For information about next steps and transplanting, check out the next blog in the series: Lavender Propagation (Part 3): Care and Transplanting. Good luck!
Emily
Great information! I want to do that soon, do you think September in zone 5 is too late? Should I wait till next spring? Thanks 🙂
Rebecca Olson[ Post Author ]
Hello! For softwood cuttings propagation (the instructions for this blog) you need to wait until the spring. It is definitely possible to do hardwood cutting propagation in the fall, but that is not what this blog describes. According to the experts, hardwood cuttings are easier than softwood – so I don’t want to discourage you from trying that. I am planning to try hardwood propagation for the first time this fall and will blog about that as well, but probably not in time for you to read that blog and take the cuttings this year. The general steps are the same, but in terms of when to cut, how to prepare the stems, etc. there will be differences. If you want to do hardwood cuttings, I’m sure you can google other sources and find out how to do it. You could always try doing some hardwood cuttings this fall, and then if they don’t work out, use my softwood cuttings blog to try again in the spring. Keep me posted, and good luck!
Lavender Care: When and where to plant? - Lavender Connection
[…] bought some starts from your local nursery, or you tried your hand at propagating (read: parts one, two, and three of our Lavender Propagation blog series) you have new lavender starts that you’re […]